You may not be aware of Your Timeline feature. Take it if you like to be tracked 24X7 or leave it if you do not want to be tracked. Maybe you are okay if you get tracked occasionally. The choice is yours! It is a known feature, we have read about it often but still not many people use it. Some are using it without being aware that they are using a feature that is tracking their every movement. This article will help you understand the feature and how to activate or deactivate it, as required.
Enable Location History
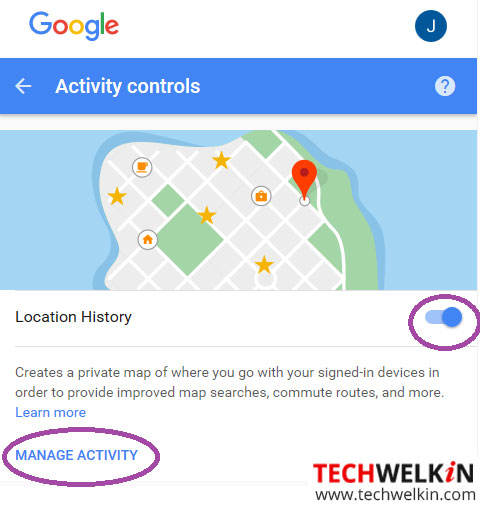
If you have a Google account, you can use the Timeline feature on your computer or on your Android mobile phone. Google tracks your location through Google Maps, which works on the Android phone and the web as well. Google also uses your search and browsing information, GPS, Wi-Fi, cell towers and device sensors like gyroscopes and accelerometers to create your timeline. To access this feature, you must enable the Location History on your computer or on your mobile phone. It supports phones running Android 2.3 or higher. To activate the feature on your computer: Note: The steps mentioned for various functions in this article are more or less the same but the options may differ depending on the desktop OS version and the phone device that you are using.
On your Android Phone, go to Settings > Location Services > Location (ON) > Location Services.
If you have not traveled, the page may be blank. However, if you have traveled then you can scroll down to see the places that you have visited on certain days and time.
Checking the Timeline
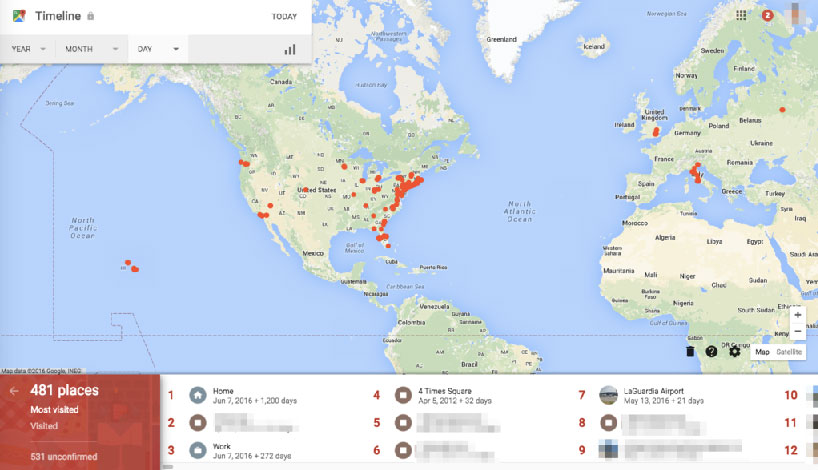
Your Timeline shows the locations you have visited on day-to-day basis as illustrated in the image below. This information displays on the Your Timeline page on desktop and in the Android app on your device.
To view all the features and in detail, it is recommended that you check Timeline on your desktop. You will be able to view the world map with dots on the places that you have visited. You can zoom into specific locations for a detailed view and address. Timeline also displays if you walked, drove or flew down to the specific location. If you use Google Photos, the Timeline will display the pictures that you clicked on the way. If you assign names to frequently visited places, like — Work, Vacation, and Home in Google Maps, they will be labeled the same way in your Timeline as well. You can also use the Timeline feature that lets you export your geospatial data as a KML file, and look at it in Google Earth, where it will play as an animation
Editing the Timeline
The Google Timeline does not display exact details all the time. Sometimes it shows a wrong location or does not display the location that you remember visiting. If you do encounter similar inaccuracies, you can select individual locations in Your Timeline to change the reported place or remove it from your day without deleting all the others. The steps to edit the Timeline on your desktop, Android or iPhone, remain the same but depending on the device, the options may differ.
Disable the Location History
If you do not want Google to track you all the time, you can turn off the Location History option. To turn off the Google Location History on desktop:
Go to Your Timeline page and click on Pause Location History.
To turn off the Google Location History on Android:
On your phone, select Settings > Location> Google Location History and toggle Off to turn off the location history.
To turn off the Google Location History for iOS: When you disable the Location History, Google Maps stops collecting the locations that you visit with your device to add them to your Location History map. Google warns that disabling the Location History will limit the functionality of some of the Google products like Google Maps and Google Now. You must also know that pausing Location History does not turn off Location Reporting or location services for a given device. It is good to decide wisely the services that you want to enable or disable.
Deleting Location History
To delete all or a range of location data: Within the Timeline page, select the Settings icon at the bottom right corner and select Delete Location History range or Delete all Location History. Being tracked sounds scary but it is not so because you can always choose to disable or enable the option. You can also delete the complete history or delete the details of a specific day or time.
Conclusion
Personally, with the Location History and Location Reporting on, I would feel like a criminal on the run whose every movement is tracked. It sounds eerie to me. With no dearth of hackers, I do not think I would want my movements to be tracked by intruders either. I would rather use the services cautiously as and when required and after use, ensure to delete the complete location data. Unless I decide to write my travelogue, I do not think I would want to use the feature. Do not go by my personal opinion, use the feature and share your experience with us. Should you have any question on this topic, please feel free to ask in the comments section. We, at TechWelkin and our reader community will try to assist you. Thank you for using TechWelkin!

